|
Please first see
<Disclaimer> section at the
bottom.
This
document is related to the standalone desktop
"Professional" editions of Project 2003 and Project 2007.
The corresponding dialog boxes
of the "Standard" editions
may not contain some of the controls found in the dialog
boxes shown below.
The keyboard shortcuts listed here may also
work in other versions; review the related product
documentation of the other versions for changes and
additions.
In this article we will focus on the keyboard
shortcuts supported in the dialog boxes. A question
that I answered in a Project forum a while ago, has
inspired me to write this article. The poster was asking
about whether a keyboard shortcut exists to open the
drop-down calendar in the Start box, on the General tab
of the Task Information dialog box.
Introduction
Before introduction of the mouse as a pointing
device for the desktop computer systems, the keyboard
was used to enter both commands and data to the
application software. Then the mouse took place of the keyboard while giving
commands to the operating system or to the application
software running on the system; and the keyboard commands
became the keyboard shortcuts, an optional
feature of the user interface complementing the
actions performed by using the mouse. For today’s desktop computer users, the
keyboard shortcuts may not be a vital element of the
user interface that is widely used in daily computing, especially after the
introduction of some
other alternative input devices and
interfaces, such as touchscreen-enabled application
software running on touchscreen-based hardware, but they are
still useful to many users.
Let us continue with the definition of a keyboard shortcut ? A keyboard shortcut is a specific key or key combination used to trigger
an action on the application software or on the
operating system. The keyboard shortcuts enable us to perform
certain actions in a two-handed input. We can also use
our preferred set of keyboard shortcuts together with
the mouse actions in order to work more productively.
Note that Project has a large set of keyboard
shortcuts in all standalone desktop versions and the
lists are available for all versions/editions in the product help pages. Some
single key keyboard shortcuts, like the function key F3,
are easy to memorize and they may be very practical to
use.
Getting back to the forum question mentioned at the
beginning of the article; the answer is “yes”.
Project also supports keyboard shortcuts for navigating
in the dialog boxes
and the shortcut to display or hide the
drop-down calendar is the function key <F4> or
the key combination <Alt + Down Arrow>. In
fact,
this is not a shortcut specific to Project since the
controls in Office applications
follow a common convention in the user interface.
We will now discuss the keyboard shortcuts
that we can use while navigating in the dialog boxes. Contrary to the main menu
system, the interface of the dialog boxes has not
changed much through the versions, except for the controls
added for the new features.
Dialog boxes are an important user interface
element for the
user in communicating with the application software and
they
have various functions in Project, for
instance, displaying
information on errors, warnings or for feedback to the
user; and/or getting information from the user in order
to perform certain operations on the active project
plan. Dialog boxes are also used to enter the project data.
Project has many dialog boxes; search for
the “Dialog Box Reference” section in the help
documentation.
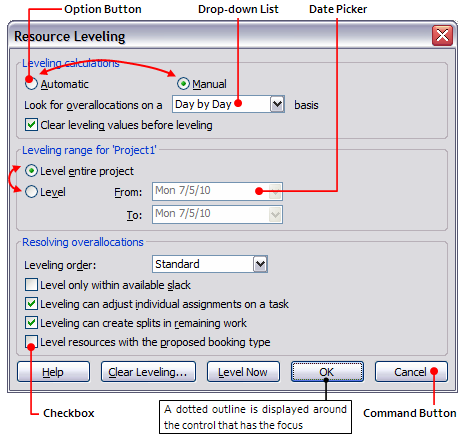
A group of two or more option buttons (or
radio buttons) allowing a single option to be selected,
a checkbox to turn a setting on or off, a drop-down list
to select an item from, a date drop-down (date picker) to enter or
select a date, an entry box (or edit box, text box) to enter
information, a command button performing a specific
operation when clicked, a spin box (up and down arrows,
called spin button, which increases or
decreases numeric data inside the box; e.g. the Duration
box in the Task Information dialog box) are the controls
(or elements) that can be
found in a standard dialog box.
In Project, clicking any pull-down menu
command which contains an ellipsis (three dots) launches
a dialog box; the same dialog boxes or the others can be
launched by clicking the corresponding icons (or
buttons), if they exist, in the Toolbars.
Note - Launching Dialog Boxes, for the versions Project 2010 or
later
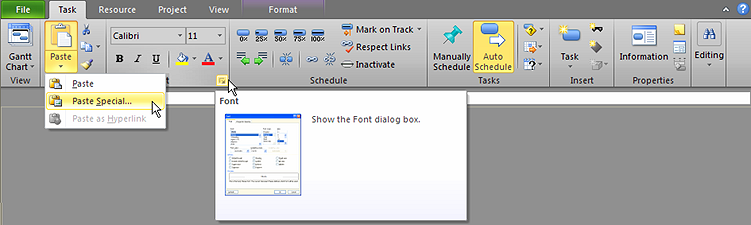
The following picture shows some examples on
how the dialog boxes are launched in the new FluentÔ User Interface (also referred to as Tabbed Interface or the
Ribbon): the "Paste Special..." command opening the
Paste Special dialog box and the "Group dialog
launcher" opening the Font dialog box. Other
commands in the Ribbon may also open the other dialog boxes.
There are two types of dialog boxes: modal
and modeless. The Task Information dialog box is a
modal dialog box since we must close it in order to
access the previous window; for example, a task view
containing a table in the background. On the other hand,
the Assign Resources dialog box is a modeless dialog box
since we can keep it open while performing other
operations in the previous window; for example, moving
focus to (that is, selecting) another task in order to
assign resources. Modeless dialog boxes always stay on
the top.
Using keyboard shortcuts to navigate in the dialog boxes
A dialog box may contain a Help button that can be
activated to display the help content; and also pressing
<F1> opens the help page for the current dialog
box or the tab.
In a dialog box, a control that has the focus is called
the active or the selected control; this means that
our keyboard actions will be effective on that control
of the dialog box until we move the focus to another
control. This state of a control is indicated in various
ways depending on the type of the control; e.g. by a
dotted outline around the control or by highlighted
default initial content in a box, or by a blinking
cursor in an entry box.
How to move focus through the controls
Use <Tab> key on the keyboard to move forward (in
the direction shown by the red arrows in the following
picture) through the controls in a dialog box; or use <Shift
+ Tab> to move backward (that is, opposite to the
direction shown by the red arrows) through the controls
in a dialog box.

Using the underlined letter on a control to change the
setting of the control
Note the underlined letter (also called an
access key) on each control (except for the following
command buttons: OK, Cancel and Close); these
letters when used in combination with the <Alt>
key on the keyboard change the state of the control.
Instead of the <Alt + underlined key>
combination, we can directly use <underlined letter>
to perform actions on the control if the focus is not
currently in a box (there are four of them in the
Resource Leveling dialog box shown above). In this case,
we should use <Tab> or <Shift + Tab> to
move the focus from the box first, and then we can use
any underlined letter in the dialog box to perform an
action on the control associated with that underlined
letter.
Activating the command buttons
Note that when a dialog box has been opened, a button shadow or a frame in a different color (the color
changes depending on the theme settings on the system)
around a command button designates the default command
button and the focus is initially set to the default
button (this is indicated by a dotted outline) or to
another control by default (e.g. a text box). If no other command button
has the focus at the moment, then pressing <Enter>
in a dialog box activates the default command button and
applies the new settings.
If the default command button has been grayed out,
pressing <Enter> does nothing and this indicates
that the dialog box is expecting further action from the
user before enabling access to the default button. As it
is also shown in the pictures above, the OK
button is the default command button in the Resource
Leveling dialog box.
Pressing <Enter> or <Spacebar> on the
keyboard activates (e.g. clicks) the selected command
button.
If the command button has an underlined letter in the
label, then pressing <Alt + underlined key>
on the keyboard also activates the command button. As an
example from the Resource Leveling dialog box; pressing
<Alt + L> on the keyboard, clicks the Level
Now command button. Note that we can also use just
the key <L> or <l> if the focus is not
currently on any of the four drop-downs.
Changing the setting of a checkbox
Pressing <Alt + underlined letter> or <Spacebar>
toggles the current setting of the selected checkbox.
For example, pressing <Alt + s> or just s
on the keyboard, turns the Level only within
available slack checkbox on or off.
Option buttons
A group of the option buttons forms a section in a
dialog box and they act like a single control.
Therefore, pressing <Tab> or <Shift + Tab>
moves focus to the next or the previous section of the
controls, respectively. We can move the
focus among the option buttons (as shown with red arrows
in the picture above) by
using the arrow keys, when the focus is on any of the
option buttons in the option group.
We can also use the underlined letters; pressing <Alt + underlined letter>
on the keyboard selects the option button associated
with the underlined letter and clears the other one in
the group. For example, pressing <Alt + A> or
just A (or a) selects Automatic and
clears Manual.
Drop-downs
There are two drop-down lists in the Resource Leveling
dialog box. They are a list to select the period from (Look
for overallocations on a <period> basis)
and a list to select the leveling order. Dialog box
initially displays the defaults for all the controls.
Steps to change the drop-down setting are as follows:
-
We can use <Tab> or <Shift + Tab>
to move the focus to the drop-downs or the <Alt +
underlined letter> combination to directly select
the drop-downs; then Project highlights the default
item in the box to indicate that the focus is on the box
of the drop-down list.
For example, hitting <d> or <Alt + d>
combination on the keyboard highlights <Standard>
in the Leveling order box, that is, the action sets the
focus to this drop-down control.
-
We can now select an item by using up and down
arrows on the list (or by using the first letter of any
item) and pressing the <Enter> key in order to
set the value of the drop-down control to the item
selected. In fact, we do not need to open the list to
select an item; instead, we can just use up and down
arrows to display all the values of the list one by one
in the box until we find the one that we are looking
for.
There are two date drop-downs (date picker controls) in the dialog box;
Level From and Level To. We can
enter a valid date value by either typing in/pasting or
selecting from the drop-down calendar. As explained
above,
we can use the function key <F4>
or the <Alt + Down arrow>
combination to either display or hide the drop-down
calendar; the
Escape button (<Esc>) can also be used to hide
the drop-down calendar. Note that pressing <T> or <t>
when the drop-down calendar
is open sets the date in the box to today’s date and closes the
calendar so there is no need to hit <Enter>
further to
close the calendar afterwards. As another example of
using the date picker control to enter today's date, press <F4>and
then <T> or <t> on the keyboard in
the Deadline cell of any task in a task table or in the Deadline
box on the Advanced tab of the Task Information dialog box.
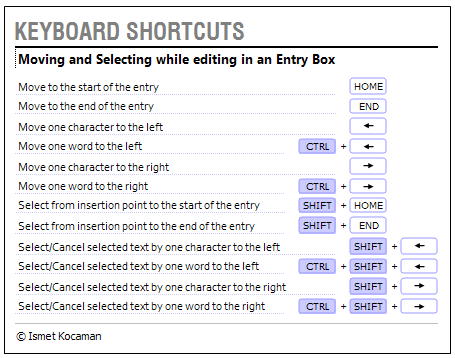
We can also enter a date by typing in the box. The keyboard shortcuts
supported in the Entry Bar can also be used in these
boxes while editing a date entry.
Closing the dialog box
Pressing <Enter> or <Spacebar> on the
keyboard when the <OK> button is active, applies
the current settings and closes the dialog box. Setting
focus to and then activating the <Cancel> button or
pressing the <Esc> button on the
keyboard closes the dialog box without applying any
change that we have made to the settings.
Pressing <Alt + Spacebar> on the keyboard opens
the Control Menu in the upper-left corner of the dialog
box and this menu contains two commands: Move and
Close. Selecting the Close command in the
menu and pressing <Enter> or pressing the
underlined letter <C> on the keyboard closes the
dialog box; or pressing <Alt + F4> also closes
the dialog box. All these actions are the same as
clicking the red close button in the upper-right corner of the dialog box by using the
mouse. Note that using the Close command in the
menu or the red close button has the same effect as the
<Cancel> command button in the dialog box.
Also
note that the modeless dialog box Assign Resources has a
<Close> command button instead of a <Cancel>
command button since the operations performed cannot be
undone by using a <Cancel> command; besides,
neither pressing <Esc> on the keyboard nor
clicking the red close button can help with cancelling the operations
that have already been performed in this dialog box. We must use Edit | Undo command or the
keyboard shortcut <Ctrl + Z>.
There is also a Move command on the Control Menu.
When we select the Move command and press <Enter>
or just hit the access key <M> on the keyboard,
the mouse pointer will change to a thick four-pointed
arrow; we
can now freely move the dialog box by using the arrow
keys on the keyboard. We can exit the Move
command by pressing <Enter>, leaving the dialog
box in its final position; or press <Esc> to exit
the command and return the dialog box to the original
position.
Tabbed dialog boxes
We can use the shortcut <Ctrl + Tab> to display
the next tab or the shortcut <Ctrl + Shift + Tab>
to display the previous tab in a tabbed dialog box, for
example, in the Task Information dialog box. When a tab
label has the focus (if not, press the <Tab> key until you move focus
from the controls to the active tab label), we can use the left or the right arrow keys to navigate
between tabs. In Project, a tabbed dialog box opens with a default tab
in our first access during a Project session but
afterwards it opens with the last tab displayed before
closing the dialog box.
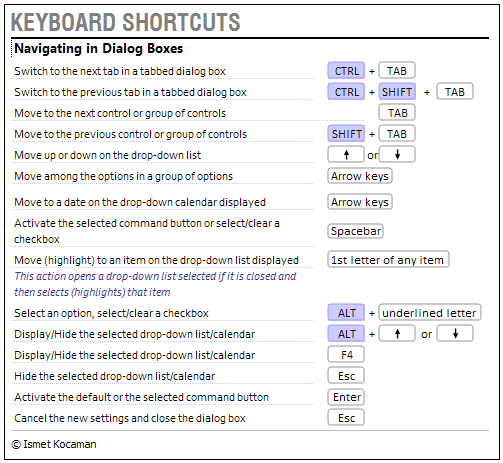
The table above lists the keyboard shortcuts that can be
used while navigating in the dialog boxes. The following
table shows some keyboard shortcuts that can be used
while entering information into an entry box (i.e. an
edit box; for example, From box in the Resource
Leveling dialog box or Notes box in the Task
Information dialog box).
Note that some of the Project dialog
boxes may have different accessibility features than the
ones mentioned above so always review the product help pages
of the dialog boxes for the related information.
|